


SylenThunder
-
Posts
7,032 -
Joined
-
Last visited
-
Days Won
12
Content Type
Profiles
Forums
Store
Articles
A20 Bugs
A21 Bugs
Events
Posts posted by SylenThunder
-
-
Yeah, I always run into that with a clean build and a large map.
0 -
Why are only 8 players supported? When can we have more?
I'm going to refer to a recent post my madmole on this....
speaking of which where say on the list is optimizing for 32 players?Its not on the list. This was originally a SP game but we decided to support 8 coop, then later added 8 dedi. At some point if we can make some optimizations we'll increase it some, but optimizations can be pie in the sky, so we are never going to promise support for an unknown. Besides, most people who play this game play 2-4 player pve with friends. Its not a pvp game and never will be. The goal was to make the zombies such a threat that people would have to band together to survive and wouldn't have TIME to kill other players because of impending doom.
ROFL No, it's not. In fact, it's 136 SqKm SMALLER than the default map size for A16. I did the math. Most servers, especially the good ones, run at 50 people playing at once. There is no way a map this tiny is going to work for that. I know you have said that "the game is made for 8 people" before. But, here's the thing, you make the game for your player base, not for you. And I can promise you that your player base doesn't want tiny little 64 sqkm maps. Now, if your goal is to stop people from playing the game, then by all means, continue the way you are going with A17.It was not designed for 8 people just because we felt like it. That number was so players could have a good experience based on the performance of the game. Every player adds overhead and slows down the server. Too many and it becomes a lag fest, then we get the blame.
2 -
Which make me wonder why in the world I stuck it here instead of in the MP forum. Moving to MP. I'd stick it in General Discussion, but there's too many sticky threads there already.Seed names work the same on both consoles.0 -
You have to open the ports in the firewall for people to connect, and for it to be seen. (I'm assuming that you set it to show up on the server list.)
)Command is "ufw allow port#". Then restart ufw afterwards.
As for the server shutting down after 8 hours, we'd need more information and a log.
0 -
Is there any way to change the teleport command to only allow teleport between friends or have an accept/deny? the tele command can easily be abused by players.
Not with the basic commands. I believe that the Botman server manager allows this to some extent, but I've only grazed over it's features atm. I don't have personal experience with it.
0 -
7dtd.sh updateengine --experimental
I've had mixed results doing it with an existing install though. Best to wipe the Engine folder, and then run the command.
0 -
As of a14, 64-bit is the default for the Linux dedi.
0 -
Someone finally visited that area and now she's gone. I have no one on the map right now, yet there are 19 Hostiles spread out all over the place. I thought they were supposed to despawn if no one is online. Is that still true?
I think if they are honed in on a player they do not.
0 -
Yeah, running multiple servers on one box with some fairly large random gen maps, I learned about ulimit real quick. I think I've got it set at 16000 right now, but I know in one iteration I had to just give up and make them unlimited.
0 -
Yeah, it's en_US. I'm starting to get some odd errors on the 32-bit running now. Nothing really apparent, but after the server has been up a while it starts doing weird things. I was initially thinking it was just due to system load being too high, but after monitoring it for a bit the past few days, system load appears to be just fine. So I'm either having core issues with 16.04, or something more sinister is happening, and with my luck that's a hard drive. (Since that's the only component I don't have a spare for.)
Going to have to crawl into the basement and poke the hardware this weekend. It really irks me that the CPU's are SSE3, but the system is only capable of reading SSE2. LOL.
0 -
I manually edited the scripts so that when I used --experimental, it would get the stable_u52 version.
I was getting that when I had wiped the Engine folder and was re-installing. Because for some reason, even using --force it only verifies the files, and does not actually install the different version.
That's odd with the bootstrapper. I swear when I ran it after the system wipe it ran the installers for the pre-requisites and they failed because they were already installed. I'll have to try that again this weekend.
So far I absolutely cannot run either the stable, or the experimental u52 version at all. (Not in 32-bit nor 64-bit) I've stuck with the stable 32-bit version for now. More experimentation is needed to figure out why the u52 builds cannot read xml files in 64-bit and give pulseaudio errors in 32-bit.
When a15 hits, I'll probably just have to give up hosting because I cannot afford newer hardware.
0 -
Lately when I'm running the scripts, I get the following errors. I can't say for certain that I've never had them before, but I just started noticing as I'm still tinkering with this damn server build I've got going on.
root@7DTD:~# 7dtd.sh updateengine --experimentalLocal buildid:     1189196


Continue? (yn) y
Updating...
Redirecting stderr to '/root/Steam/logs/stderr.txt'
[  0%] Checking for available updates...
[----] Verifying installation...
Steam Console Client (c) Valve Corporation
-- type 'quit' to exit --
Loading Steam API...applicationmanager.cpp (3091) : Assertion Failed: CApplicationManager::GetMountVolume: invalid index
applicationmanager.cpp (3091) : Assertion Failed: CApplicationManager::GetMountVolume: invalid index
applicationmanager.cpp (3242) : Assertion Failed: m_vecInstallBaseFolders.Count() > 0
Created shared memory when not owner SteamController_Shared_mem
OK.


Connecting anonymously to Steam Public...Logged in OK
Waiting for license info...OK
applicationmanager.cpp (3242) : Assertion Failed: m_vecInstallBaseFolders.Count() > 0
Update state (0x3) reconfiguring, progress: 0.00 (0 / 0)
In this particular instance, I'm attempting to update to the experimental_u52 version, which in the end, it doesn't actually do anyway since it just verifies the files without actually making any changes. I'll have to wipe the folders and re-install it to get the u52 build.
The assertion failures concerns me a bit though. I don't know if it's nothing, or if it's a sign of a deeper issue in my server I haven't noticed yet.
Oh, and just for reference. This is a clean Ubuntu 16.04 install with using this package.
P.S. Something else I noticed on the initial run. It looks like you added the pre-requisite installers into the initial build install.
0 -
Installing and Running a Dedicated Server
OK, this one is going to need a lot more meat to it, but I'll start with the basics.
First, lets cover the many different ways to run a dedicated server.
- Installing the dedi build locally through Steam and running it.
- Installing the dedi build locally via SteamCMD.
- Setting up a separate PC to host the dedi server. (Windows or Linux are most common)
- Renting a server in the "cloud". (Most expensive option, usually Windows server)
Your choice in how you host will largely depend on your hardware and network availability, stability, and how much load you need to support. It doesn't take super fast hardware, but you do need a good amount of RAM, a very stable system, and decent bandwidth.
My personal favorite is to use a local dedicated machine for the server with Linux. You can pick whatever flavor you like, but I find Ubuntu to be one of the easiest to set up.
A great thanks to Alloc on this for creating the Server Management Scripts and Server Fixes. Not only does a full setup take less than 15 minutes, but with his fixes you get loads of extra features that are extremely helpful for hosting a full-time dedi server.
Here is a simple guide to installing the dedicated server on Windows using SteamCMD. (Easy to do on a dedicated box without Steam installed.)
https://developer.valvesoftware.com/wiki/7_Days_to_Die_Dedicated_Server
For local install, you can just install the server via your Steam client from the Library > Tools menu. Then you'll follow a similar configuration as is laid out in the above link for SteamCMD.
Don't forget to open/forward your ports in your modem/router if you are hosting a local dedi.
Later I will add some more detailed information on setups, and using rented servers. I mostly wanted this done before I forgot about it though.
 0
0 - Installing the dedi build locally through Steam and running it.
-
A guide to migrating save files.
DISCLAIMER: Each new build (Stable or Experimental) requires that you start a new save. If you are playing an older save on a new build, you should expect to encounter problems/bugs. Starting with a15, it may be possible to continue from one stable build to the next, but you will not experience any new content. (You also may still get errors and bugs.)
OK, so you want to move your saves from one computer to another. Or from a SP game to a P2P MP game, or to a dedi. Or from dedi to SP, or any number of possible combinations. First, you need to know where the files are. Then you need to know where to put them.
Now, for the SP games, we already covered the paths above so I'll refrain from repeating that. Those same folder paths will also cover the P2P MP games launched from your local client.
The location of your dedicated MP save folders will differ though, and it depends largely on how the server was set up and configured.
Windows 2008-16 server will typically be using the same folder as your local client would in "%appdata%\7DaysToDie". It is possible that they were set up in a different folder such as "\SteamCMD\7_Days_to_Die_server\Saves".
Linux will differ even more depending on which Linux build you are using, and the way you set up the dedicated server. I personally recommend only using Alloc's dedicated server scripts.
If you are using Alloc's scripts to create the instance, it will be in the following folder.
/home/sdtd/instances/<instance name>
If you know other common save locations, please feel free to PM me and let me know so I can add them.
Now that you have found your saves, all you need to do is copy the data over.
If you have a Navezgane map, It will be saved in Saves\Navezgane\<name of save\.
If you have a Random Gen map, It will be saved in Saves\Random Gen\<name of save\.
With a17 there is an additional folder in your gameclient directory. 7 Days to Die\Data\Worlds\[WORLD_NAME]
As of a18/19 the generated worlds are now stored in "%appdata%\7DaysToDie\Generated Worlds\[WORLD_NAME]"
In the Save folder root of a MP game, there will be a file named "players.xml" which contains basic information about the players and their last login information. It also contains land claim block information if they have placed one. In the folder you will have a "Player" folder which contains the character information, inventory, and personal map for each player on your server. The "Region" folder contains all of the region files that make up the land in the map.
You will just need to copy the data you wish to migrate out of the original save folder, and into it's new home, following the same structure within the save folders. If you are migrating to a Linux dedi, be sure to check the file permissions after you have moved them over. They should be 644 on the files in the Saves Root, and 755 on all of the other files. Owner:group should be the same as the user account used for the dedi installation. (i.e. sdtd:sdtd if you are using Alloc's install script)
0 -
[sP] Where are my saves at?
In the Windows client they would normally be located in the following folder.
Windows XP (because some people still use it, even though no one supports it.)
C:\Documents and Settings\<User>\AppData\Roaming\7DaysToDie
Windows Vista/7/8/10
C:\Users\<User>\AppData\Roaming\7DaysToDie
C:\Games\Steam\SteamApps\common\7 Days to Die\Data\Worlds\WORLD_NAME
NOTE: On the Windows PC's the AppData folder is hidden. You can access it directly for the logged in user by entering %appdata% into the address bar of Windows Explorer.
Linux
<User>/.local/share/7DaysToDie
<Install Path>\7 Days to Die\Data\Worlds\WORLD_NAME
MacOS
<User>/Library/Application Support/7DaysToDie
<Install Path>\7 Days to Die\Data\Worlds\WORLD_NAME
These locations are assuming standard client installs.
In the "7DaysToDie\SavesLocal" folder, you will find your locally stored data from the MP servers you have logged into and played.
In the "7DaysToDie\Saves" folder, you will find your local profile and SP save games.
In the "7 Days to Die\Data\Worlds" folder, you will find the saved world data for each map. The folders are named on the Generated map name.
Moving Save Location to Another Drive
This is especially helpful when you are short of space on your 😄 drive, or wish to move your save data to a faster drive for better performance.- Open the Steam Client
- Navigate to your Games Library
- Right-Click on 7 Days To Die in the left navigation bar.
- Click Properties
- Click on the Local Files Tab
-
Click the "Browse Local Files" Button
-This will open a Windows Explorer Window. The next Steps Take Place in Windows Explorer - Copy serverconfig.xml and rename the copy to serverconfig.SP.xml (or any other name you'll remember).
-
Open serverconfig.SP.xml in notepad and edit the save path to where you want the 7DTD Gamesaves to be stored.
Note: Most of the serverconfig.xml properties are ignored when running the Client version of the game, but that property does carry over correctly.
Here is an example from my file:<property name="SaveGameFolder" value="D:\GameSaves\7DTD\Saves" />
- Save as serverconfig.SP.xml
- In the steam client.
- Right Click 7 Days To Die and select properties
- General Tab, Click Set Launch Options button.
-
Place the following in the box:
-configfile=serverconfig.SP.xml
Now when you start the game it will use your path for the save files.
NOTE: You probably want to move your old save files from "%appdata%\7 Days To Die\Saves" to the new location.0 -
[DEDI] How to fix issue with "IOException: Too many open files"
Now this is an issue you will likely only see on a Linux dedicated server. However, if you have a rather large Random World Map, it is a very real issue. What surprised me even more, was how very little documentation there is on this. That may be due to a smaller number of servers using Linux. Even though Linux is faster with a lower resource overhead, most paid server hosts use Windows for easier management.
In any case, you've got your server running, everything seems fine. After a while though, it suddenly starts to get a bit sluggish, and has trouble loading map areas. The server may even crash completely, or get to the point where it will not even start up anymore.
If you check the logs for the server, you will see the following inside of them....
IOException: Too many open files
at System.IO.FileStream..ctor (System.String path, FileMode mode, FileAccess access, FileShare share, Int32 bufferSize, Boolean anonymous, FileOptions options) [0x00000] in <filename unknown>:0
at System.IO.FileStream..ctor (System.String path, FileMode mode, FileAccess access, FileShare share) [0x00000] in <filename unknown>:0
By default, Linux sets the hard file limit at 1024. Basically, you have so many region files that this limit is being exceeded with the client files open, and the other standard processes. (Especially if you are using Allocs mapping tool)
To correct the issue, you will need to increase your hard and soft file limits.
Step 1. Run "ulimit -a". You will likely see an ouput similar to this.
core file size (blocks, -c) 0
data seg size (kbytes, -d) unlimited
scheduling priority (-e) 0
file size (blocks, -f) unlimited
pending signals (-i) 515561
max locked memory (kbytes, -l) 64
max memory size (kbytes, -m) unlimited
[color=#FF0000]open files (-n) 1024[/color]
pipe size (512 bytes, -p) 8
POSIX message queues (bytes, -q) 819200
real-time priority (-r) 0
stack size (kbytes, -s) 8192
cpu time (seconds, -t) unlimited
max user processes (-u) 515561
virtual memory (kbytes, -v) unlimited
file locks (-x) unlimited
Step 2. Open /etc/security/limits.conf with your favorite editor. (I like nano, but you can use almost anything.)
Step 3. Go to the following section of the file where you see this...
#*               soft    core            0
#root            hard    core            100000
#*               hard    rss             10000
#@student        hard    nproc           20
#@faculty        soft    nproc           20
#@faculty        hard    nproc           50
#ftp             hard    nproc           0
#ftp             -       chroot          /ftp
#@student        -       maxlogins       4
Then you will add these two lines of code...
*               soft    nofile            4096
*               hard    nofile            8192
Now the bottom of your file should look like this....
*               soft    nofile            4096
*               hard    nofile            8192
#*               soft    core            0
#root            hard    core            100000
#*               hard    rss             10000
#@student        hard    nproc           20
#@faculty        soft    nproc           20
#@faculty        hard    nproc           50
#ftp             hard    nproc           0
#ftp             -       chroot          /ftp
#@student        -       maxlogins       4

# End of file
Step 4. Reboot the machine/container to apply the new file limit and you should be good to go. Depending on the size of your map, you may need to increase the file limits. At one point I ended up just making mine unlimited because with two RWG servers I was having to double the limit every couple of days.
Step 5. Run "ulimit -a" again to verify the change. It should now look like the following.
core file size (blocks, -c) 0
data seg size (kbytes, -d) unlimited
scheduling priority (-e) 0
file size (blocks, -f) unlimited
pending signals (-i) 515561
max locked memory (kbytes, -l) 64
max memory size (kbytes, -m) unlimited
[color=#FF0000]open files (-n) 4096[/color]
pipe size (512 bytes, -p) 8
POSIX message queues (bytes, -q) 819200
real-time priority (-r) 0
stack size (kbytes, -s) 8192
cpu time (seconds, -t) unlimited
max user processes (-u) 515561
virtual memory (kbytes, -v) unlimited
file locks (-x) unlimited
Now you should be good to go!
0 -
Why are you telling me to exclude the program from my Antivirus software?
Antivirus software is a must-have in today's age of computing if your PC is attached to the internet at all. (Some will argue otherwise, but for 95% of PC users this is a simple fact.)
Unfortunately, the scans that it runs on active processes can have an negative impact in your game clients performance. Since we trust Steam, and their vetting process, to prevent us from being sent malware through games we purchase, we can safely trust them as a publisher. As such, I recommend excluding the entire Steam folder rather than just your 7DaysToDie folder under SeamApps\Common.
In fact, I keep all of my games from trusted publishers in a "Games" folder, and have excluded that entire folder. Steam, Origin, and other such tools all reside inside of this folder, along with individually purchased games from other companies I trust.
You will also need to exclude your save folder in %appdata% It will be in C:\Users\<userName>\AppData\Roaming\7DaysToDie Mine for example is C:\Users\sylen\AppData\Roaming\7DaysToDie
How to exclude the program from your Antivirus software.
Truly, the biggest hurdle in doing this is figuring out how to perform the exclusion in your particular software. As such, I have compiled a list of the top 10 Antivirus solutions and am providing links to their instructions. Microsoft Security Essentials does not make the top 10 by any stretch, but I'll include it just because it is common if you haven't purchased a real AV solution.
1. BitDefenter (#1 for 4 years straight BTW)
2. Kaspersky (Used to be that Kaspersky and AVG were heavy contenders for #1 and #2, but Kaspersky has held #2 solid for a while.)
3. McAffee
4. Norton (Page 44)
5. F-Secure
6. Avira
7. Panda (It's from 2012, but it's the best they have available)
8. Trend Micro
9. BullGuard (You'll have to scroll down the page a bit for the instructions.)
10. eScan
11. Avast!
12. AVG (I think the biggest thing keeping AVG from ranking higher is the large number of false positives and the high impact on system performance)
13. G Data
14. Norman (It's convoluted, but the instructions are there)
15. ESET NOD32
16. Microsoft Security Essentials
If you don't have one of the above programs, just do what I did to get the above links. Go to the website for your antivirus software, go to the support section, search for "exclude folder", then follow the instructions to exclude the entire client directory. (Alternatively, you can also Google "nameofantivirus exclude folder".)
0 -
EAC Basic Troubleshooting steps
Now you want to play that server, and it's got EAC enabled. For some reason, every time you start the client with EAC it crashes. Here's some things that may help get you running again.
1. System Specs
If you are running at the minimum recommended specs or below, it may just be a lack of available system resources.
In this particular case, running the 32-bit client may resolve your issue.
2. Launch error : Error validating EasyAntiCheat code signing certificate.
This is most common when you are not up-to-date on Windows Updates, and your Certificate Store is outdated.
To resolve the issue, fully update Windows and try again. You may also need to fully exclude your game client from your Antivirus software.
As a final resort you could try to manually import the GlobalSign "CodeSign" and "EV CodeSign" Root Certificates from https://support.globalsign.com/customer/portal/articles/1426602-globalsign-root-certificates
3. Kicked from server, or unable to join. EAC disconnected from server/backend error.
There are a few things that can cause this to occur.
-
Your antivirus software is delaying the data.
- The most common fix for this is to exclude the client folder from your antivirus software's active and passive scans.
[*]Your firewall is blocking/delaying the data packets.
- Very much like the issue with antivirus software, you will need to add a rule to your firewall for the games .exe files.
[*]Network hardware driver issues.
- Thank you to Almanac for finding this fix. After doing all the usual troubleshooting, he discovered that the issue was caused by an out-dated driver for his network adapter.
[*]You're on bad Wifi.
- Yes, wifi is getting much faster, and can do a lot more. Unfortunately, most people don't have a good AC router with 6 antennas and a PC with dual-antenna support to take full advantage of it. That isn't even counting the 300 other things that can be causing interference, or completely interrupting your signal.
4.
0 -
Your antivirus software is delaying the data.
-
What is EAC, and why do I want it?
EAC is an anti-cheat engine. It's primarily used my dedicated servers to prevent hackers from joining and causing problems. The system isn't 100% effective, because hackers can be darn smart, but it does keep most of the riff-raff out.
If you are planning on joining a server that has the EAc client protection turned on, you will need to launch the game with EAC. One thing to be aware of, is that when launching with EAC, the game will take considerably longer to load as EAC must check and verify the integrity of the client files to ensure that they meet the checksums. On an average system, this can change the client startup time from 30 seconds to a couple of minutes.
Also I should mention, EAC will use more system resources and may impact your performance if you are on a moderate or low-end system.
If you wish to disable it, simply follow the above instructions and un-tick the option for EAC.
0 -
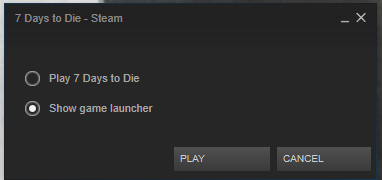
How to install and use the 32-bit client for low-end PC's
NOTE: Only valid for builds before Alpha 15.
For Windows user running a 64 bit version of the system.
You can use the game launcher to try downloading the 32 bit version of the game and check if that runs any different.
This is also very helpful for those with less than 12GB RAM, dual-core or low-end CPU's, or if you are using a GPU rated below a GTX650/Radeon 7790.
NOTE: The minimum requirement is 6GB RAM as of a16. If you have less, you need to upgrade.
-
Right-click the game in your Steam Library
-
Select Show Game Launcher from the menu
-
When the launcher opens select Switch to 32-bit
- Select Run & Save as default
0 -
Right-click the game in your Steam Library
-
Why do I get such low FPS on this when I can play _______ just fine at full settings?
There are two very big reasons behind this.
The first is the very nature of Voxel games. Rather than just displaying 2D images onto 3D planes that are fixed and don't require any additional calculations; the voxel game is constantly keeping track of position, texture, and stats for every single block in your range of view.
The second is simply optimization. This game is still in the Alpha state. Optimization is something that is incomplete, and still being worked on. As features get added, changed, or removed, it changes the overall balance, and then things have to be optimized all over again.
As the game gets closer to a final release, you will see a lot more work being put into overall optimization, and performance will very likely improve significantly.
0 -
What is the difference between a Voxel game, and all the other games I play?
Before Voxel games, just about everything out there is just polygons on vertexes. Polygons are easy to lay out, and overall the only real overhead you have with it depends on the size and resolution of the textures.
Polygon technology (Most non-voxel games)
Imagine three points in space. Join them up with lines to form a triangle, then fill that triangle in red. Congratulations, you've just rendered a polygon in the same way a graphics card does!
Essentially, this is how polygon graphics work: joining lots of points in space (vertexes) together, and filling the space between them (polygons) with colors (textures).
If we were to make a cube, we'd need 8 vertexes (the corners), and fill the space between them with six four-sided polygons. We never "see" vertexes – they're just the points in space, we only see the polygons between them.
Here's a video of how texture painting on vertexes/polygons works:
Polygon meshes are the most flexible and precise way of storing and rendering terrain. They are often used in games where precise control or advanced terrain features are needed.
Pros:
- Very fast: You only have to do the usual projection calculation in the vertex shader. A geometry shader isn't needed.
- Very precise: All coordinates are store individually for each vertex, so it's possible to move them horizontally and increase mesh density in places with finer details.
- Low memory impact: This also means the mesh will usually need less memory than a heightmap, because vertices can be more sparse in areas with less small features.
- No artifacts: The mesh is rendered as-is, so there won't be any glitches or strange-looking borders.
- Advanced terrain features: It's possible to leave holes and create overhangs. Tunnels are seamless.
Cons:
- Poor dynamic LOD: Only possible with pre-computed meshes. This will cause "jumps" when switching without additional data to map old to new vertices.
- Not easy to modify: Finding vertices that correspond to an area that should be modified is slow.
- Not very efficient for collision detection: Unlike in heightmaps and voxel data, the memory address for a certain location usually can't be calculated directly. This means physics and game logic that depend on the exact surface geometry will most likely run slower than with the other storage formats.
Voxel technology (7DTD, Landmark, Minecraft, ect.)
Voxel technology basically says: we want points in space that we can see. Voxels can be thought of as being visible points in 3d space, and are somewhat analgous to a 2-dimensional pixel.
Additionally, voxels can contain properties in much the way vertexes do and (depending on the engine and environment) can serve to decrease graphics acceleration requirements. These advantages aren't free, though.
Voxel terrain stores terrain data for each point in a 3D grid. This method always uses the most storage per meaningful surface detail, even if you use compression methods like sparse octrees.
(The term "voxel engine" was often used to describe a method of ray marching terrain heightmaps common in older 3D games. This section applies only to terrain stored as voxel data.)
Pros:
- Continuous 3D data: Voxels are pretty much the only efficient way to store continuous data about hidden terrain features like ore veins.
- Easy to modify: Uncompressed voxel data can be changed easily.
- Advanced terrain features: It's possible to create overhangs. Tunnels are seamless.
- Interesting terrain generation: Minecraft does this by overlaying noise functions and gradients with predefined terrain features (trees, dungeons).
Cons:
- Slow: To render voxel data, you either have to use a ray tracer or compute a mesh, for example with marching cubes (There will be artifacts). Neighboring voxel aren't independent for mesh generation and the shaders are more complicated and usually produce more complex geometry. Rendering voxel data with high LOD can be very slow.
- Huge storage requirements: Storing voxel data uses lots of memory. It's often not practicable to load the voxel data into VRAM for this reason, as you'd have to use smaller textures to compensate for it, even on modern hardware.
0 -
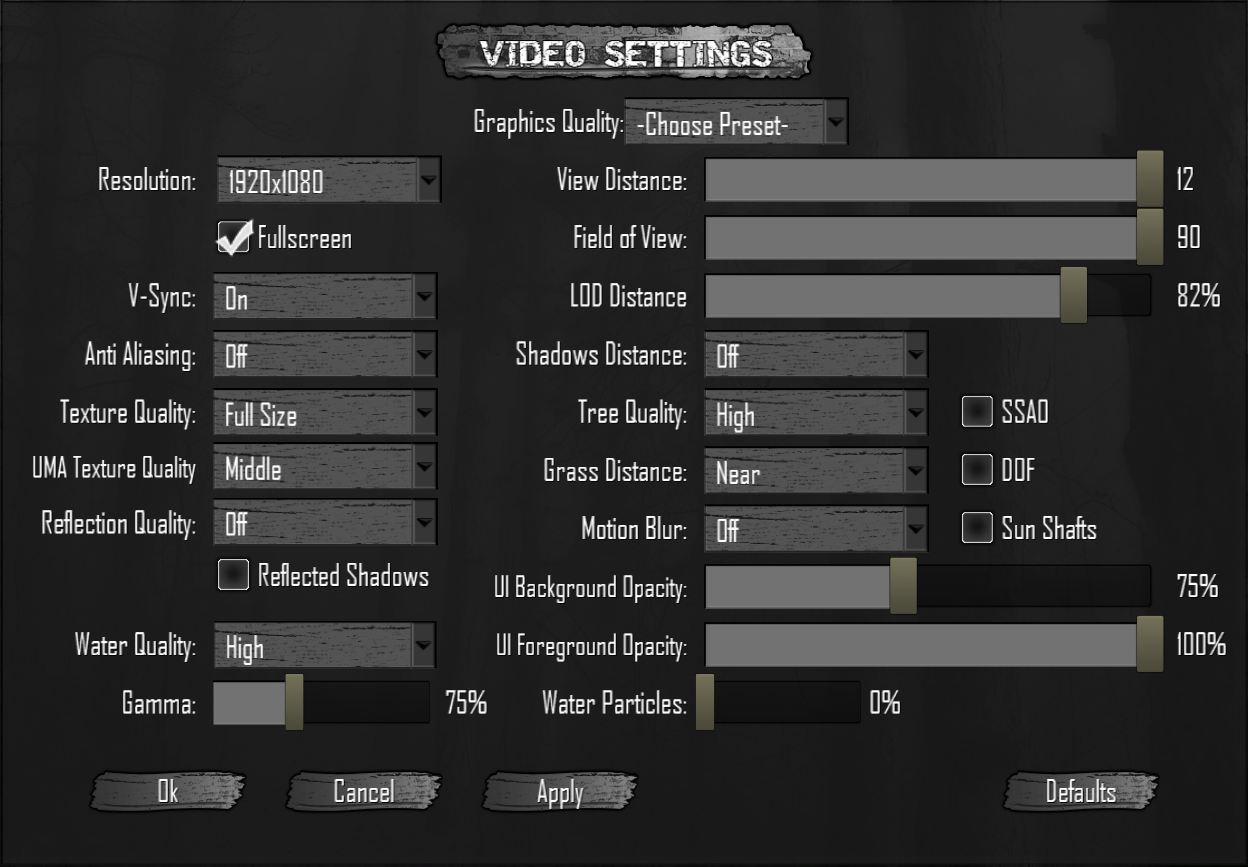
What effect does each video option have?
Display Resolution: Sets the screen resolution at which the game is displayed.
Performance Impact:Very HighLarger resolutions will decrease your performance.Fullscreen: Run the game in fullscreen or windowed mode.
Performance Impact:MediumWindowed mode will have a negative impact on performance in most operating systems.Vertical Synchronization: Combats screen tearing by synchronizing the game to the monitors refresh rate.
Performance Impact:LowThis is a great option to cap the FPS of the game at the FPS for your monitor.Anti- Aliasing: Removes jagged edges from objects.
Performance Impact:MediumI would only recommend using this options on a higher-end card.Texture Quality: Saves video memory and performance by setting the texture resolution.
Performance Impact:MediumReflection Quality: How clear reflections are. Provides more realistic lighting.
Performance Impact:Very HighAt the time of this writing, "Very High" is a bit of an understatement. This feature still needs to be optimized better.Reflected Shadows: Shadows are processed and displayed inside reflections.
Performance Impact:HighWater Quality: Layers and effects occurring on surface of water planes.
Performance Impact:LowLow quality water is very dark and difficult to see through.Gamma: How bright the game is.
Performance Impact:LowView Distance: How far the world can me viewed.
Performance Impact:HighField of View: How wide your view angle is.
Performance Impact:LowHigher settings can cause a "fisheye" look with curving at the outer edges of the screen.Level of Detail: The overall maximum level of detail at which the world is displayed. As you move further away from an object, it switches to a lower quality version of the mesh
Performance Impact:HighLower values decrease quality of distanced textures and improve performance.Shadow Distance: Quality and distance of object shadows.
Performance Impact:HighThis is the second largest item that affects overall performance on most mid/low-range cards.Tree Quality: Overall quality of the trees based on how far away they are.
Performance Impact:HighSetting this lower than high will cause distant trees to render as stick poles until you get into closer range.(Like LOD for trees)Grass Distance: The maximum distance at which you can see grass.
Performance Impact:MediumMotion Blur: Quality level of motion blur (more pixel samples & smoothing).
Performance Impact:HighUI Background Opacity: UI wallpaper / background opacity / transparency.
Performance Impact:Very LowUI Foreground Opacity: UI outlines and text opacity / transparency.
Performance Impact:Very LowSSAO (Screen Space Ambient Occlusion): Use the image effect SSAO which draws more detailed shadows on objects.
Performance Impact:MediumDOF (Depth of Field): Distant objects get blurred.
Performance impact:MediumCan help to obfuscate a low LOD setting without as large of an impact on performance as a high LOD.Sun Shafts: A.K.A. "God Rays". Shines rays of light from the sun past obstructing objects.
Performance Impact:MediumAuthor's note: With the above settings I get a very solid 60 FPS with an i7 3930k, and a GTX 660 Ti.
0 -
What are the system requirements for a dedicated server?
They are basically the same as the client, but you don't need a GPU for it. Also, I think the hardware differences don't really matter as much since any server-level platform is going to be similarly geared.
Minimum
- Processor: 2.8 Ghz Quad Core Cpu
- Memory: 8GB RAM
- Network: Broadband internet connection (minimum upload bandwidth of 2.5Mbps recommended)
- Hard Drive: 20 GB available space
Recommended
- Processor: 3.2 Ghz Quad Core CPU or faster
- Memory: 16 GB RAM
- Network: Broadband internet connection (minimum upload bandwidth of 10Mbps recommended)
- Hard Drive: 20 GB available space
NOTE: The more people you have connecting to your server, the more bandwidth and RAM you will need available.
Also note that you may need up to 15GB of drive space for a large RWG map, the client, and a large amount of player data.
The server setting for players downloading the map has a max of 1300KiB. This is roughly equivalent to 10Mbps.
Additionally, you will need to open the following ports in your firewall.
TCP
- 8080-8081 (ONLY if you plan to administer your server remotely.)
- 8082 (If you are using Alloc's mods, this is for the web map.)
- 26900
UDP
- 26900-26903
Required Ports for Steam
-
To log into Steam and download content:
- HTTP (TCP port 80) and HTTPS (443)
- UDP 27015 through 27030
- TCP 27015 through 27030
[*]Steam Client
- UDP 27000 to 27015 inclusive (Game client traffic)
- UDP 27015 to 27030 inclusive (Typically Matchmaking and HLTV)
- UDP 27031 and 27036 (incoming, for In-Home Streaming)
- TCP 27036 and 27037 (incoming, for In-Home Streaming)
- UDP 4380
[*]Dedicated or Listen Servers
- TCP 27015 (SRCDS Rcon port)
[*]Steamworks P2P Networking and Steam Voice Chat
- UDP 3478 (Outbound)
- UDP 4379 (Outbound)
- UDP 4380 (Outbound)
Lastly, don't forget to set up port forwarding on your router.
Don't know how to port forward? follow these instructions:
- Go to this Site.
- Select your router brand
- Select your router version. (If your version is not there, pick the one closest to your version.)
- Select 7 Days to Die.
- Follow the instructions on the site.
Port Default Protocol Direction Used for BasePort 26900 TCP In Game (Game details query port) BasePort+0 26900 UDP In Game (Steam's master server list interface) BasePort+1 26901 UDP In Game (Steam communication) BasePort+2 26902 UDP In Game (networking via LiteNetLib) BasePort+3 26903 UDP In Currently unused, but not opening may block joining the server. WebDashboardPort 8080 TCP In Web based control panel TelnetPort 8081 TCP In "Telnet" control interface - Use RAW connection WebControlPort+2 8082 TCP In Web Panel of the Server fixes 0


SUPPORT FAQ: Information and Common Solutions
in General Support
Posted
How Much RAM Does the Game Use?
OK, so using Process Explorer to monitor solely Private memory allocated by the client. This is only the RAM being used by the process, not shared, virtual, or the page file.
Now, the system for this test...
Intel Core i7-3930K
16GB RAM
GTX660Ti
For this test, I logged into a MP server I play on regularly, went from my base into the nearest town. Then killed a few Z's.
[TABLE=class: grid, width: 500, align: center]
[TR]
[TD]Starting Up[/TD]
[TD]3.2GB[/TD]
[/TR]
[TR]
[TD]On Server Selection Screen[/TD]
[TD]3.3GB[/TD]
[/TR]
[TR]
[TD]Connecting to the server[/TD]
[TD]5.4GB[/TD]
[/TR]
[TR]
[TD]In-game Forest biome[/TD]
[TD]5.7GB[/TD]
[/TR]
[TR]
[TD]Approaching an average town[/TD]
[TD]6.2GB[/TD]
[/TR]
[TR]
[TD]Exploring the town[/TD]
[TD]6.5GB[/TD]
[/TR]
[TR]
[TD]Back on the startup screen[/TD]
[TD]6.0GB[/TD]
[/TR]
[TR]
[TD]After closing the client, before release[/TD]
[TD]2.8GB[/TD]
[/TR]
[/TABLE]
Then I started a new Navezgane map...
[TABLE=class: grid, width: 500, align: center]
[TR]
[TD]Starting Up[/TD]
[TD]3.2GB[/TD]
[/TR]
[TR]
[TD]On Server Selection Screen[/TD]
[TD]3.3GB[/TD]
[/TR]
[TR]
[TD]Connecting to the server[/TD]
[TD]4.2GB[/TD]
[/TR]
[TR]
[TD]In-game NW Wasteland biome[/TD]
[TD]5.2GB[/TD]
[/TR]
[TR]
[TD]In-game Forest biome[/TD]
[TD]5.9GB[/TD]
[/TR]
[TR]
[TD]In-game farm / Diersville approach[/TD]
[TD]6.3GB[/TD]
[/TR]
[TR]
[TD]Diersville Hospital after travelling through center[/TD]
[TD]6.6GB[/TD]
[/TR]
[TR]
[TD]Exploring the town and killing Z's[/TD]
[TD]6.9GB[/TD]
[/TR]
[TR]
[TD]Back on the startup screen[/TD]
[TD]6.2GB[/TD]
[/TR]
[TR]
[TD]After closing the client, before release[/TD]
[TD]2.5GB[/TD]
[/TR]
[/TABLE]
So very similar results. I spent a bit longer in-game doing this test, and traveled greater distances. This likely accounts for the slightly larger numbers. It also probably gives a more accurate example.
I would imagine that if you have less RAM than this available, it's just going to start dumping to swap/pagefile/whatever you want to call it. I'll have to set up a different config to test on the laptop that only has 8GB RAM, and build another PC with only 4GB RAM.